OAuth2.0
사용자의 인증 및 권한을 부여하기 위한 프로토콜이다.
다양한 서비스에서 로그인할 때 사용 된다. → 카카오, 네이버, 구글로 로그인하기 와 같은 기능을 구현하는 방식이다.

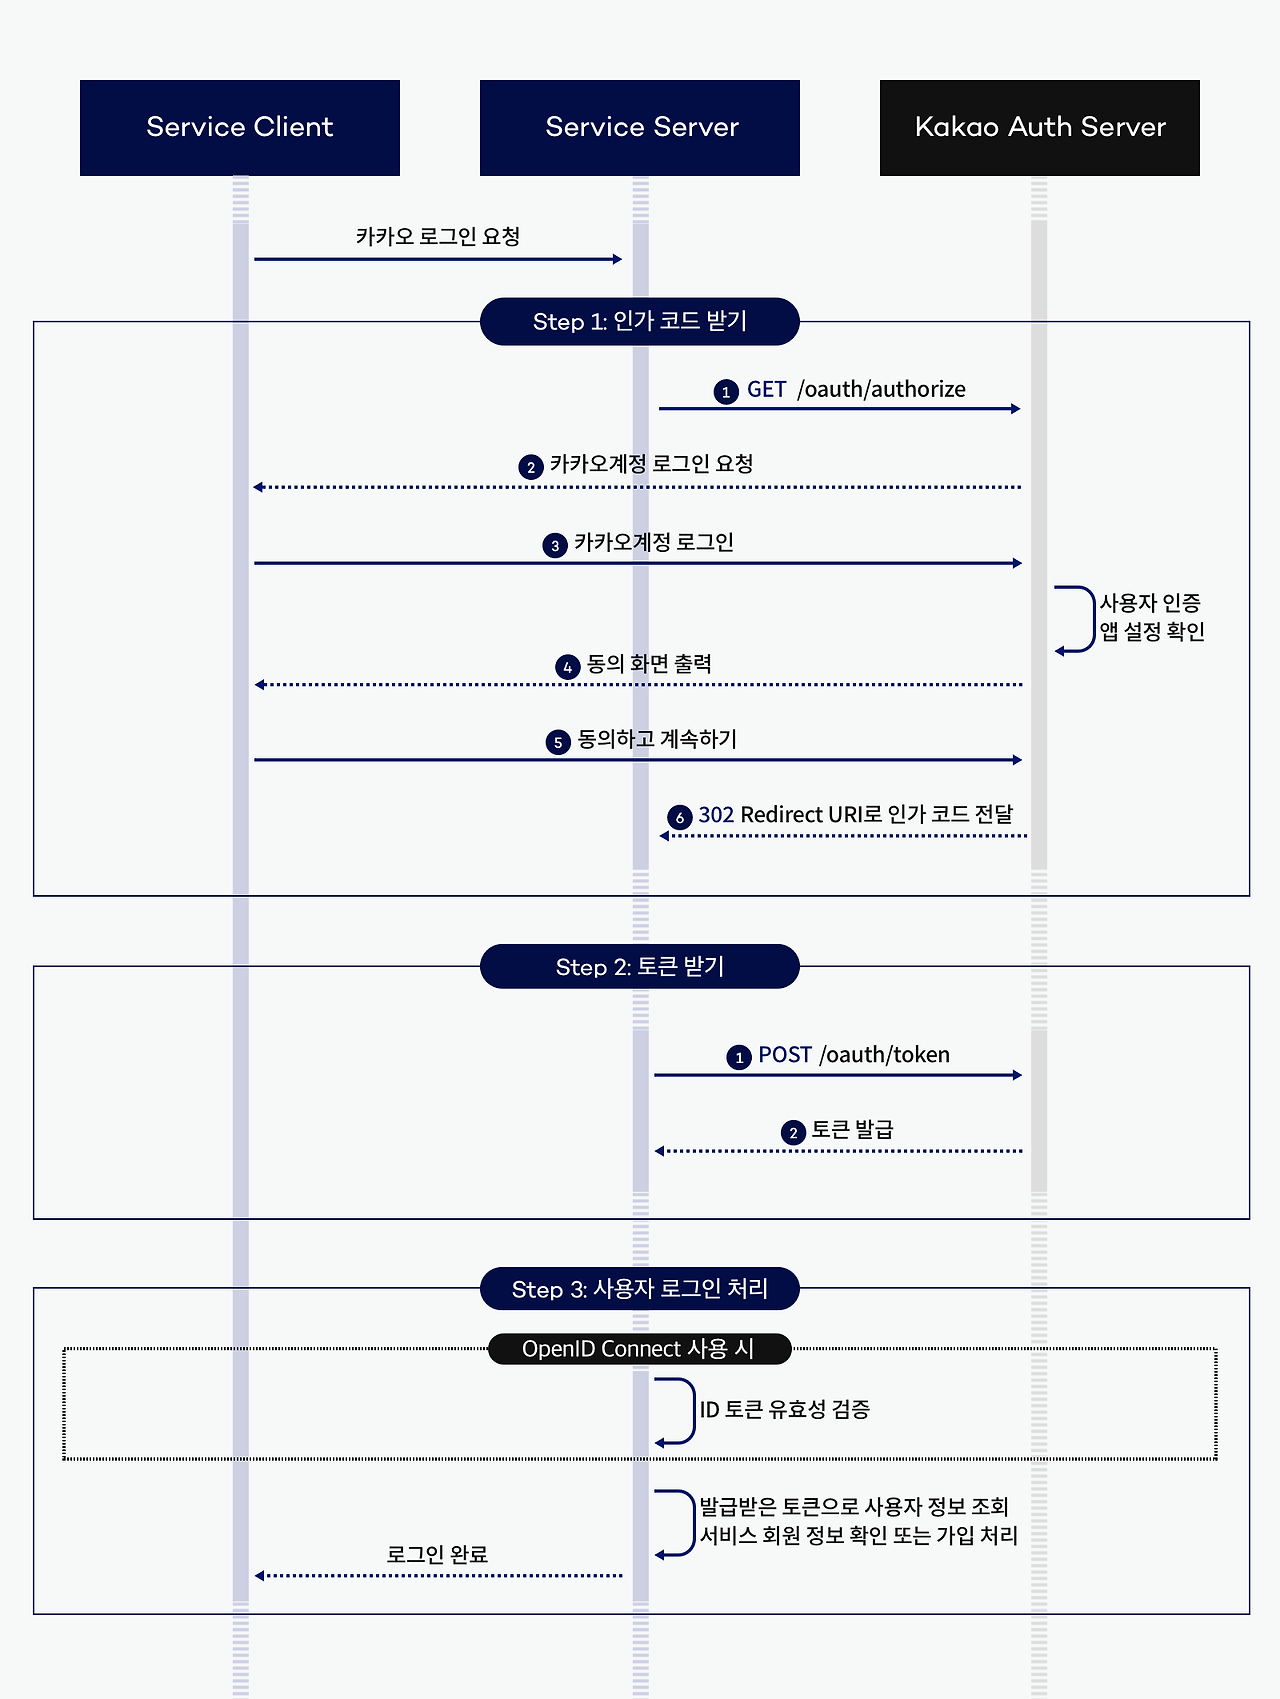
다음은 일반적인 oauth2.0과 카카오의 oauth2.0의 동작 방식을 정의해 놓은 시퀀스 다이어그램이다.
대부분의 oauth2.0은 위와 비슷한 방식으로 처리 된다.
client
- 구글이나 카카오를 통해 로그인하려는 앱 → 사용자가 사용하는 기기
Resource Owner(리소스 소유자)
- 자원을 소유하는 사용자(로그인을 하는 사용자) → 사용자의 구글 이메일이나, 사진 등의 권한을 허용할 수 있음.
Authorization Server(인증서버)
- 클라이언트에게 인증을 제공하고 엑세스 토큰을 발급하는 서버이다.
Resource Server(리소스 서버)
- 리소스 소유자의 데이터를 실제로 보관하는 서버.
Access Token
- client가 인증받은 후 리소스 서버에 접근할 수 있도록 발급되는 토큰
- 이 토큰을 이용하여 리소스 서버에서 개인정보를 받을 수 있다.
- 만료기간이 짧음
Refresh Token
- access token의 유효 기간이 만료된 후 새로운 access token을 얻기 위해 사용하는 토큰
- 만료기간이 Access Token에 비해 김
Spring에서 google, kakao, naver oauth2.0설정
스프링의 resource의 yml 파일 설정은 다음과 같이하고 client id와 sceret에 각 사이트의 develop에서 발급받은 id 비밀번호를 넣으면 된다.
spring:
  security:
    oauth2:
      client:
        registration:
          google:
            client-id: YOUR_GOOGLE_CLIENT_ID
            client-secret: YOUR_GOOGLE_CLIENT_SECRET
            scope: profile, email
            redirect-uri: "{baseUrl}/login/oauth2/code/google"
            client-name: Google
          naver:
            client-id: YOUR_NAVER_CLIENT_ID
            client-secret: YOUR_NAVER_CLIENT_SECRET
            scope: name, email
            redirect-uri: "{baseUrl}/login/oauth2/code/naver"
            client-name: Naver
            provider: naver
          kakao:
            client-id: YOUR_KAKAO_CLIENT_ID
            client-secret: YOUR_KAKAO_CLIENT_SECRET
            scope: profile_nickname, account_email
            redirect-uri: "{baseUrl}/login/oauth2/code/kakao"
            client-name: Kakao
            provider: kakao
        provider:
          kakao:
            authorization-uri: <https://kauth.kakao.com/oauth/authorize>
            token-uri: <https://kauth.kakao.com/oauth/token>
            user-info-uri: <https://kapi.kakao.com/v2/user/me>
            user-name-attribute: id
          naver:
            authorization-uri: <https://nid.naver.com/oauth2.0/authorize>
            token-uri: <https://nid.naver.com/oauth2.0/token>
            user-info-uri: <https://openapi.naver.com/v1/nid/me>
            user-name-attribute: response
package com.est.oauth2.config;
import org.springframework.context.annotation.Bean;
import org.springframework.context.annotation.Configuration;
import org.springframework.security.config.Customizer;
import org.springframework.security.config.annotation.web.builders.HttpSecurity;
import org.springframework.security.web.SecurityFilterChain;
@Configuration
public class SecurityConfiguration {
@Bean
public SecurityFilterChain securityFilterChain(HttpSecurity http) throws Exception {
return http
.csrf(csrf -> csrf.disable())
.formLogin(form -> form.disable())
.oauth2Login(Customizer.withDefaults()) // oauth2.0로그인 방식
.authorizeHttpRequests(
auth -> auth.requestMatchers("/login")
.anonymous()
.requestMatchers("/user/**")
.hasAnyAuthority("USER")
.requestMatchers("/admin/**")
.hasAnyAuthority("ADMIN")
.anyRequest()
.authenticated()
)
.build();
}
}설정을 마친 뒤 다음과 같이 OAuth2User 객체를 사용하여 정보를 사용할 수 있다.
@Controller
public class HomeController {

    @GetMapping("/home")
    public String home(@AuthenticationPrincipal OAuth2User oAuth2User, Model model) {
        model.addAttribute("name", oAuth2User.getAttribute("name")); // 사용자 이름
        model.addAttribute("email", oAuth2User.getAttribute("email")); // 이메일
        return "home"; // home.html
    }
}'Spring' 카테고리의 다른 글
| @Component가 Spring Boot에 등록되는 과정 (0) | 2026.06.04 |
|---|---|
| Redis와 사용법 (0) | 2025.06.29 |
| [오르미 백엔드7기] (Spring Security , Cors,CSRF) (1) | 2024.11.29 |
| [오르미 백엔드7기](Spring 프록시객체, 지연로딩 ,즉시로딩, 영속성전이, N+1문제) (1) | 2024.11.25 |
| [오르미 백엔드 7기] (Spring Entity 개념, 연관관계, 공통속성정의) (0) | 2024.11.25 |